Introduction
Machine tools are capable of producing work at a faster rate, but there are occasions when
components are processed at the bench. Sometimes, it becomes necessary to replace or repair
component which must be fit accurately with another component on reassembly. This involves a
certain amount of hand fitting. The assembly of machine tools, jigs, gauges, etc, involves certain
amount of bench work. The accuracy of work done depends upon the experience and skill of the
fitter.
The term ‘bench work’ refers to the production of components by hand on the bench, where as
fitting deals which the assembly of mating parts, through removal of metal, to obtain the required
fit.
Both the bench work and fitting require the use of number of simple hand tools and
considerable manual efforts. The operations in the above works consist of filing, chipping,
scraping, sawing drilling, and tapping.
Holding Tools:
Bench Vice
The bench vice is a work holding device. It is the most commonly used vice in a fitting shop.
The bench vice is shown in figure below.
It is fixed to the bench with bolts and nuts. The vice body consists of two main parts, fixed jaw
and movable jaw. When the vice handle is turned in a clockwise direction, the sliding jaw forces
the work against the fixed jaw. Jaw plates are made of hardened steel. Serrations on the jaws
ensure a good grip. Jaw caps made of soft material are used to protect finished surfaces, gripped
in the vice. The size of the vice is specified by the length of the jaws.
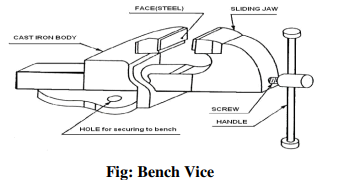
The vice body is made of cast iron which is strong in compression, weak in tension and so fractures under shocks and therefore should never be hammered.
V‐block is rectangular or square block with a V‐groove on one or both sides opposite to each other. The angle of the ‘V’ is usually 90 0 . V‐block with a clamp is used to hold cylindrical work securely, during layout of measurement, for measuring operations or for drilling for this the bar is faced longitudinally in the V‐Groove and the screw of V‐clamp is tightened. This grip the rod is firm with its axis parallel to the axis of the v‐groove.
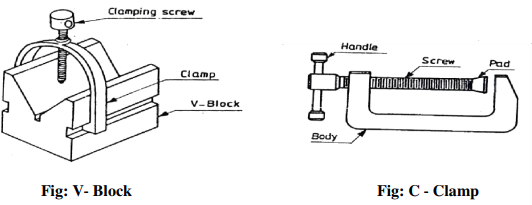
C‐ Clamp
This is used to hold work against an angle plate or v‐block or any other surface, when gripping is
require Its fixed jaw is shaped like English alphabet ‘C’ and the movable jaw is round in shape
and directly fitted to the threaded screw at the end .The working principle of this clamp is the
same as that of the bench vice.
Marking and Measuring Tools
Surface Plate
The surface plate is machined to fine limits and is used for testing the flatness of the work piece.
It is also used for marking out small box and is more precious than the marking table. The degree
of the finished depends upon whether it is designed for bench work in a fitting shop or for using
in an inspection room; the surface plate is made of Cast Iron, hardened Steel or Granite stone. It
is specified by length, width, height and grade. Handles are provided on two opposite sides, to
carry it while shifting from one place to another .

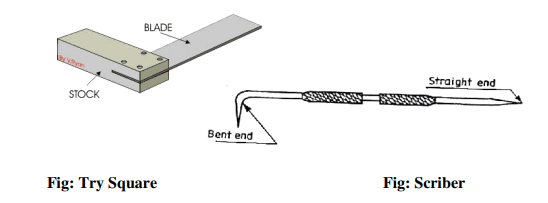
It is measuring and marking tool for ![]() angle .In practice, it is used for checking the squareness
angle .In practice, it is used for checking the squareness
of many types of small works when extreme accuracy is not required .The blade of the Try
square is made of hardened steel and the stock of cast Iron or steel. The size of the Try square is
specified by the length of the blade.
Scriber
A Scriber is a slender steel tool, used to scribe or mark lines on metal work pieces. It is made of
hardened and tempered High Carbon Steel. The Tip of the scriber is generally ground at ![]()
![]()
It is generally available in lengths, ranging from 125mm to 250mm .It has two pointed ends the
bent end is used for marking lines where the straight end cannot real.
Odd Leg Caliper
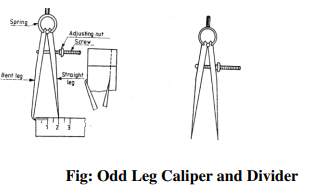
This is also called ‘Jenny Caliper’ or Hermaphrodite. This is used for marking parallel
liners from a finished edge and also for locating the center of round bars; it has one leg pointed
like a divider and the other leg bent like a caliper. It is specified by the length of the leg up to the
hinge point.
Divider
It is basically similar to the calipers except that its legs are kept straight and pointed at the
measuring edge. This is used for marking circles, arcs laying out perpendicular lines, by setting
lines. It is made of case hardened mild steel or hardened and tempered low carbon steel. Its size
is specified by the length of the leg.
Trammel is used for drawing large circles or arcs.
Punches
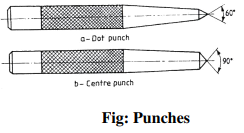
These are used for making indentations on the scribed lines, to make them visible clearly. These
are made of high carbon steel. A punch is specified by its length and diameter (say as 150’
12.5mm). It consists of a cylindrical knurled body, which is plain for some length at the top of it.
At the other end, it is ground to a point. The tapered point of the punch is hardened over a length
of 20 to 30mm.
Dot Punch is used to lightly indent along the layout lines, to locate center of holes and to
provide a small center mark for divider point, etc. for this purpose, the punch is ground to a
conical point having 60° included angle.
Center Punch is similar to the dot punch, except that it is ground to a conical point having 90°
included angle. It is used to mark the location of the holes to be drilled.
Comments are closed.